Create a Blog from Scratch & Monetize it
If you’re looking for an easy, step-by-step guide to learn how to start a blog and eventually make money from it, then you’ve come to the right place. In my very own blog post, I will show you the most simple way to get started. In fact, you can start your own blog for only $2.59/month in a few easy steps. Forget all those posts that make it seem that you are never going to catch up with established blogs, focus on my super simple 8 step process and you can have your own blog up and running in less than a week.
Table of contents
Step 1. Pick your blogs name and niche
First, it’s best to decide what you will be blogging about. Your blog’s niche is the general theme or topics that you’ll be focusing content around. It could be something like travel, fashion, technology, etc.
Once you’ve decided the niche, it’s time to pick a name for your new blog. The name of your blog is what viewers will see first (like yournewblog.com), so it should represent the topics you’ll be writing about. Inserting a word or two that clearly signals what your content is about in the name of your blog (like jewerlybyjess.com or travelwithamy.com) will be very helpful for your future readers and great for search engines. You could also use your own name or the name of your business.
If you’re not entirely sure on the topics, avoid picking a very granular blog name that won’t allow you to move away from a certain topic when you finally decide what to blog about. You’ll find clarity as you progress — rather than spending time trying to come up with the perfect idea.
Step 2. Get you blog online with web hosting
The second step in starting a blog, is actually getting your blog online with the help of a web hosting company. And before you get overwhelmed by the technical mambo jumbo, know this: YOU CAN DO IT! You don’t need to know how to code or have advanced technical skills.
In this step, we’ll be selecting the blogging platform and web hosting plan that you’ll use to get your blog live online.
The combo of blogging platform & web hosting I personally use is a WordPress blog, hosted by DreamHost. WordPress is a free publishing platform that now powers more than 60% of all blogs on the Internet. DreamHost is one of the most established blog hosting companies in the industry. So, this is the combination we’ll be using to start your blog.
Choose your plan
First, you’ll select a hosting plan. At the top, click where it says “WordPress”. Then click “WordPress Basic”. Personally, I recommend choosing the WordPress Unlimited because I like having the option of setting up multiple websites with my hosting provider.
Choosing your plan will look like this right here. You will be able to pay month-to-month or save money with an annual contract, which is what I do. Whatever you decide, click “Sign up now” to go to the next steps.

Pick your domain name
Unless you have bought a domain elsewhere, click “Register a new domain name”. Here, you can type in the name of the domain name that you’d like your blog to have (mine is maita.marketing).
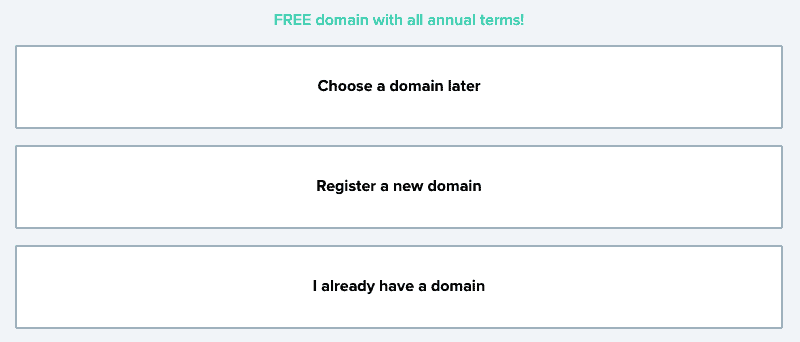
If your domain choice isn’t available, you can select the option to “Choose a domain later” after getting the rest of your account set up and taking a little more time to think the name through.
Create your DreamHost account
Start by filling in your account details like your name, address, and email address (it’s super important to use an email address you have access to because this is where your login details and account information will be sent).
Once you get to the section about adding extras, make sure Pre-Install WordPress and WP Website Builder is checked (these are both included for free). I also recommend DreamShield Protection for an additional fee if you’re looking for an added layer of protection for your website, but its not needed.
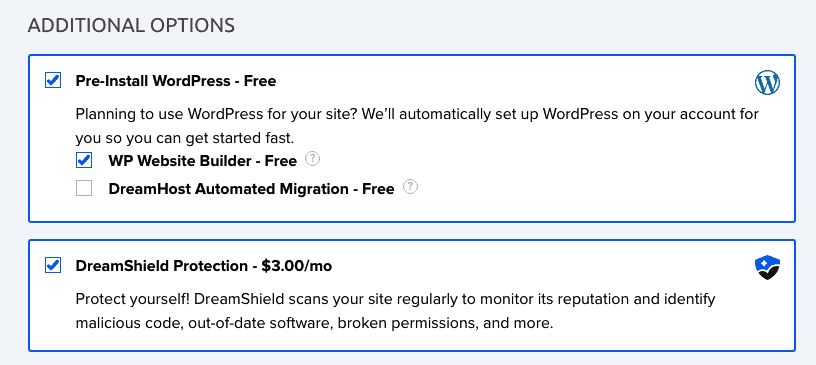
The total you’ll now see is the amount you’re going to pay today. Remember though, you won’t have to pay again for another 1 or 3 years depending on the package you chose. Plus, there’s a 97-day money back guarantee in case you want to back out of having a blog.
Once you input your billing information, check the box that you agree to DreamHost’s Terms of Service and then hit the purple “Submit your order” button.
Woo! 🙂 You’ve officially completed the first major step in starting a blog.
With the initial signup process complete, it’s time to move into the next stage of getting your blog fully setup and optimized.
Step 3. Design your blog with a free WordPress theme
Now that we’ve gotten through the setup phase of starting a blog, it’s time to have a little more fun.
Since I first started making websites, I’ve been running my own on WordPress and I greatly appreciate the amount of flexibility and options that decision has allowed me.
WordPress.org (not to be confused with WordPress.com) has:
- Highly customizable design and unlimited plugins
- Full control over your own monetization efforts
- Robust SEO features (so people can find your site easier)
- Start an eCommerce store or membership site
- FREE blogging! Besides the cheap hosting plan we set up earlier
Installing and configuring WordPress
From your DreamHost dashboard, on the left click Websites. If it looks like the one on the right (WordPress logo in the top right corner) than WordPress is already installed. Just click WordPress button and you’ll be able to access the dashboard. If it looks like the one on the left, we still need to install it!
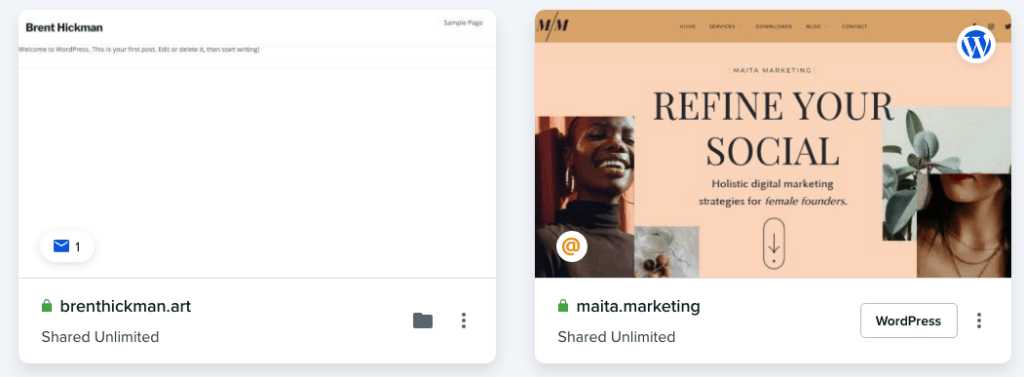
Hover over the block, and click Manage. Once that page loads, by WordPress, click Install > don’t check any boxes > Install WordPress. WordPress will install and you should be able to access the WordPress dashboard by clicking the WordPress button.
Choosing the best free WordPress theme
When you’re just getting started, you don’t have to start with a paid WordPress theme right away. A complex theme might even be a distraction from your top priority of building out content that brings readers to your new blog. [I fell victim to this, tehe]
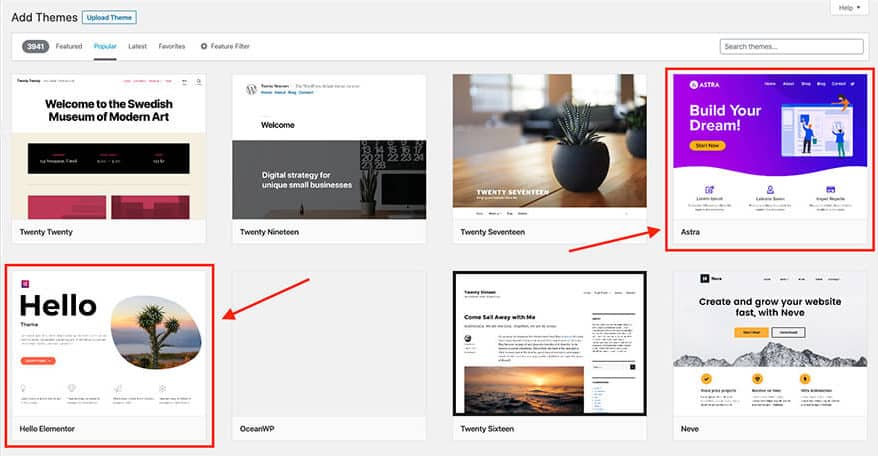
WordPress comes with a bunch of free themes to choose, so to start, go to Appearance > Themes > Add New Theme > Popular and choose one you like and installing it by clicking Activate. You can always change it later.
I recommend either the Hello Theme or Astra (both of which are 100% free and have the ability to upgrade later). I use Astra and Elementor Pro for this very website.
If you’re looking to purchase a WordPress theme right out of the gate, here are some of my favorite places to go theme hunting at (that are super affordable):
- Theme Forest – Endless choices and amazing customer service.
- Restore 316 – The ultimate vault for beautiful WordPress themes.
After you purchased the theme you will have access to a file that you need to download. To upload it on your blog, simply go to your WordPress dashboard > Appearance > Themes > Add New > Upload Theme > Install it after it uploads.
7 of my highly recommended WordPress Plugins
WordPress plugins play an important role in how your blog will function. There are literally thousands of different plugins, so let you know some of my favorites to get you started.
- Yoast SEO: You guys know how much I love SEO. The more people that can find your content, the better your website will do. This plugin helps you to optimize your blog post titles, descriptions, sitemaps, and more so that you can be found easier by search engines.
- WPForms: WPForms is an easy-to-use plugin that allow you to drag & drop contact forms onto any page of your blog. You’ll want to have at least one form on your website so that people can get in touch with you, so this makes it easy-peasy.
- Site Kit by Google: Site Kit is the one-stop solution to deploy, manage, and get insights from Google Analytics, Google Search Console, Google Tag Manager and more. You should at the very least be using Google Analytics to track your websites traffic data, and with this plugin, you won’t need to install the Global site tag yourself.
- WP Rocket: Faster websites rank better in Google and give your readers a better experience. WP Rocket is a plugin that caches your pages and reduces your file sizes to make sure that your website loads faster.
- Insert Headers and Footers: Some plugins or analytics may require you to insert pieces of code in between your template tags, which can cause issues if done incorrectly. This plugin lets you add small snippets of code easily so you don’t have to.
- Facebook Pixel: This plugin will install a Facebook Pixel for your page so you can capture the actions people take when they interact with your page. If you ever decide to set up facebook Ads, you will be one step ahead with a pre-populated pixel.
- ShortPixel: ShortPixel is an easy to use, lightweight, install-and-forget-about-it image optimization plugin that can compress all your past images and PDF documents with a single click. Faster loading website means better user experience!
Setting up basic WordPress settings
Before we get going, there are still a few backend loose ends we need to tie.
Changing your default URL
You’ll want to change the default URL of your website to include a “www” before your site URL. This will give you a URL that looks like https://blogname.com over to a more visually appealing https://www.blogname.com.
You can change this quickly by going to Settings > General and adding the “www” to both WordPress Address URL and the Site Address URL.

Setting up your homepage
My advice for now is to just set your homepage to be where your blog posts display – go to Settings > Reading > select “Your latest posts” to do that.
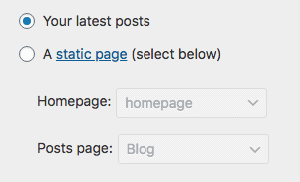
You also have the option of setting your homepage to be a static page that you can create for the homepage instead. But for now, stick with just a list of your recent blog posts as you navigate the journey of learning how to blog.
Setting up your menu
You won’t need a menu until you’ve published your main pages (About, Contact, Store, etc), but when you’re ready to create a homepage or footer menu, just go to Appearance > Menus and you can add the pages from the left panel that says Add menu items.
Create the main pages of your website
Every website needs to showcase some basic, foundational pages. They should tell readers: Who you are, What products or services you have, How they can contact you. So, some pages you should consider making:
- About
- Services/Products
- Contact
- Blog (duh)
- Legal pages (Disclosure, Privacy)
Adding a form to your contact page
All your other pages can do or say whatever you want but your Contact page should always have a contact form. One of the best ways to do this is to use a form plugin like WPForms as I mentioned before, which lets you create custom contact forms just by dragging and dropping elements. But don’t stop at the form, you still need to think about why someone might be trying to get in touch with you and consider adding FAQs to pre-answer any of those questions.
Step 4. Create your first blog post
When you read a blog, you read it because you care about what it says. Creating informative content is what will bring you readers and help you to eventually make money from your blog.
Before writing your first blog post, it helps to answer one simple question — Why?
- Why is this the topic you’re blogging about?
- Why should other people care about what you’re saying?
- Why is this blog better than the other blogs?
In order to create a business from your blog, you need to solve a real problem for people.
Gathering blog topics with keyword research
Whatever you’re going to be blogging about, you have to do keyword research in order to generate the right blog post ideas that’ll actually bring you traffic.
So to do this, head over to Ubersuggest and enter your keyword. You can click Keyword Ideas, and then browse through the Questions tab. For your first blog, I’d aim for a topic/key phrase with a low SD (SEO difficulty).
If you’re still left needing more ideas, try turning to a few other creative tactics…
- Seeing what other bloggers in my niche have wrote about and what performed well.
- Doing a quote roundup post that don’t require a ton of effort from your end.
- Talking about specific lessons you’ve recently learned and offer the advice.
Write your first blog!
Once you’ve decided on the first blog post you want to write, you’ll navigate to the “Add New Post” section from your WordPress Dashboard.
Go to Posts > Add New which will look like this right here:

After, you’ll be taken to a brand new article page that looks like a blank canvas.
So get writing!
I always aim for no less than 400 words, but 800-1000 is ideal.
Step 5. Optimize your blog post
Once you have a nice long informative blog written, you’ll want to make sure it’s formatted and set up in the best way possible for both search engines and your future readers.
Craft a click-worthy title
You’ll want to enter your title. It has to grab your readers attention or they won’t read the blog!
If you’re unsure whether you wrote a strong headline, test it with the free headline analyzer tool from the Advanced Marketing Institute. You just paste in the headline you’re thinking about using, and it gives you a score based on their analysis of millions of headlines.
Choose an SEO-friendly URL
It’s very important that you customize the URL of your new post if you want it to rank well on Google. Don’t make the permalink too long, avoid inserting numbers, and remember to separate each word in the URL with a dash. A good example would be “/best-keyword-research-programs“.
Make your blog post readable
Avoid over designing with crazy colors, multiple fonts, and an overload of images. It’s about making the experience of your reader as enjoyable as possible.
White space is so important to the readability of your blog. Look for ways to make your post flow easily, which a nice template will help you do.
Make sure your font size is big enough; 16pt or higher. You’ll also want to be careful with line length. The ideal length of a sentence on your website is 50–85 characters as it helps keep readers moving through the post.
Add a relevant featured image
By including a relevant image at the top of the post near the title, it’ll create a stronger connection with your reader. For free and beautiful photos that you can use on your own blog post, go to Unsplash and browse through their popular images.
Use headers to break up your text
Readers get tired quickly. Looking at a giant wall of text is exhausting and might make people want to leave your blog. That’s why I suggest including a heading or sub-header every 300-500 words, and even adding images above them.
Publishing your first blog
Once you’ve written your first blog post, you’re almost ready to publish!
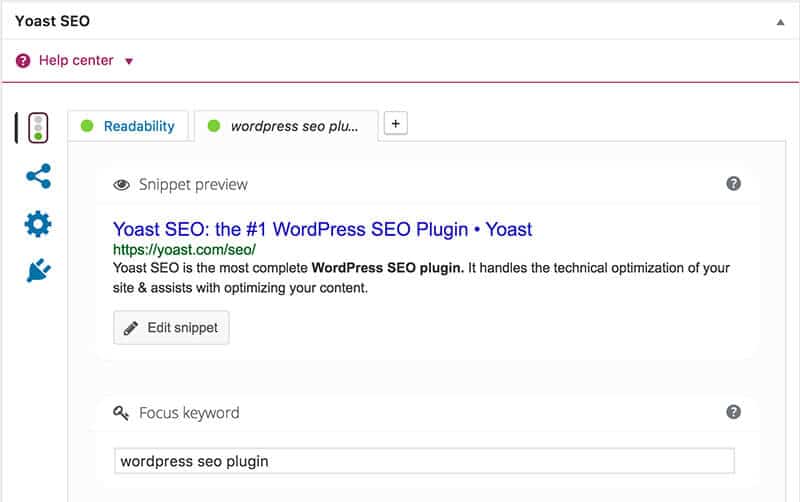
Take a few minutes to double check on the Yoast SEO suggestions and ensure your blog post is SEO-friendly, which will give you the best chance of ranking well in organic search.
Lastly, pick your category you want to file this post under. You can Add New Category if you don’t have any to choose from yet.
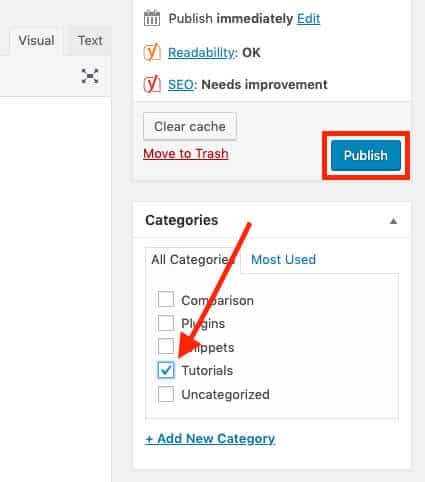
Then click Publish!
Congrats on your first blog! 🎉 🎉 🎉
Step 6. Promoting your blog
There’s one last piece of the puzzle. What do you do once you’ve hit publish on your first blog posts? It’s time to promote your blog!
But where do you start? Here are a few of the best ways to start sharing your posts and getting them in front of new readers.
Sharing on Social Media
The obvious first place to look is social media. Facebook, Twitter, YouTube, Pinterest, LinkedIn, Reddit, and Instagram are some of the biggest networks today. Whichever platform best suits your niche and audience interests is the right platform for you.
Here’s what works best on each social platform:
- Facebook: Videos, curated content
- Instagram: photography, products, shopping
- Twitter: News, blog posts, and GIFs
- YouTube: Video, how-to
- LinkedIn: Professional content, B2B
- Pinterest: Infographics, visual content, step-by-step guides
- Reddit: Niche topics and personal comments
Guest blogging on similar sites
Guest blogging on other relevant sites is the best way to connect with an already established audience. There are plenty of blogs within your niche who are looking to have a new post for their own blog, that they don’t have to write up themselves. So search for some blogs and reach out to them with your own blog post to hand over in tow.
If a large guest blogging campaign isn’t where you want to focus, try reposting your content on Medium—a site that’s free to use for readers and writers. You can even look for a Medium Publication that’s popular in your niche and submit your post to them.
Forums and message boards for bloggers
Start by browsing through relevant groups on Facebook to see if there are any similar communities that’d be a good starting point. The Social Bungalow is my favorite for female entrepreneurs. These are usually engaging groups that are happy look at what you have to offer.
If your search doesn’t come up with any Facebook Groups with a decent number of members (5,000+), look for more general groups that relate to your niche on LinkedIn or Reddit.
Optimizing your blog pages with SEO
Organic traffic is the best type of traffic for your blog since. it won’t cost you anything. It’s the direct clicks that you get when someone types a query on search engines like query and find articles on the search. When your blog starts ranking on google, you will get organic clicks without having to promote your blog. If you need some clarification on how to do this, I have a free SEO guide for beginners.
Step 7. Making money with your blog
Before you start prioritizing money-making, you need to find your readers and start building relationships with them. Once you form a community around your blog and continue delivering value, then later down the road you can try to sell them.
Freelancing
This is what I do! If you want to start earning from your blog right away, then selling your services is going to be the easiest option by far. For example, I sell my SEO and Paid Ads services to business owners who don’t have the know-how to do it themselves. You could offer anything like SEO copy writing, social media templates, or product photography.
All you really need in order to land your first freelancing client, is a strong portfolio, which is where a blog will help significantly. Being in the technical space, I started my freelancing journey with UpWork and optimized my profile page with a fun bio and listed out my services and project examples. However, UpWork takes 20% of your earnings, so the goal is to get off when you have a steady stream of clients.
Affiliate programs
Some of the biggest brands have affiliate programs. Think huge companies like Amazon, all the way down to specific niches like Skillshare. Once you’ve built even a small readership for yourself, if they’re engaged with your content and tuned in to what you have to say, they’ll be looking to purchase the products you recommend.
Start by evaluating the affiliate opportunities you find on the major networks like ShareASale to see what products they have that are relevant to your blog audience.
Online courses
Once you have a skill that others want to learn, it’s relatively easy to package your strategies, tactics, and tutorials into an online course. People can then pay for access to your accelerate course and learn much quicker than they would otherwise by going through the messy process of learning through trial and error. And what’s great about online courses as a monetization option is that you don’t need a huge audience to start earning from online courses.
Digital advertisements (Display ads)
I hate to break it to you, but traditional blog advertising doesn’t become very profitable until you’re driving close to a million monthly readers, so it’s not a great monetization channel to focus on in the short-term. But if you’re looking to have your blog costs essentially paid for, that’s an easier goal to aim for.
The best ad networks to start off on would be applying to Google Adsense. But don’t go overboard, or you might begin to annoy your readers with a busy and slow loading page.
Step 8. Learn as you go
Alright guys, I’m wrapping up 👋
Wondering how to start a blog in 2020? Easy: Just start! Just remain excited and willing to learn and you will figure it all out in time.
I recommend bookmarking this page so you can come back to it regularly as your blog grows.
And check out my SEO Starter Kit for a free beginners guide to SEO (duh) – because you want all your hard work to be found right?


This design is steller! You definitely know how to keep a reader amused.
Between your wit and your videos, I was almost moved to start my own blog
(well, almost…HaHa!) Wonderful job. I really loved what you had to say, and more than that, how you presented it.
Too cool!